

Mining and Refining guide

Hand Mining Guide

What equipment is required for precision mining and where can you obtain it?
Small resource deposits on planetary bodies can be extracted with the Greycat Pyro RYT Multitool and the correct attachment, which is currently the “OreBit” Mining Attachment.
Your standard inventory can only carry a limited amount of harvested resources, it is therefore recommended that one acquires the MacFlex Arms Orange “Rucksack” Core for additional storage. With a “Rucksack” core augmenting the standard inventory, a miner can make a handsome profit with a full load of Hadanite that will net approximately 16,500 aUEC.
Greycat Pyro RYT Multitool (425 aUEC)
Ore Bit Mining Attachment (340 aUEC)
“QuikFlares” (25 aUEC)
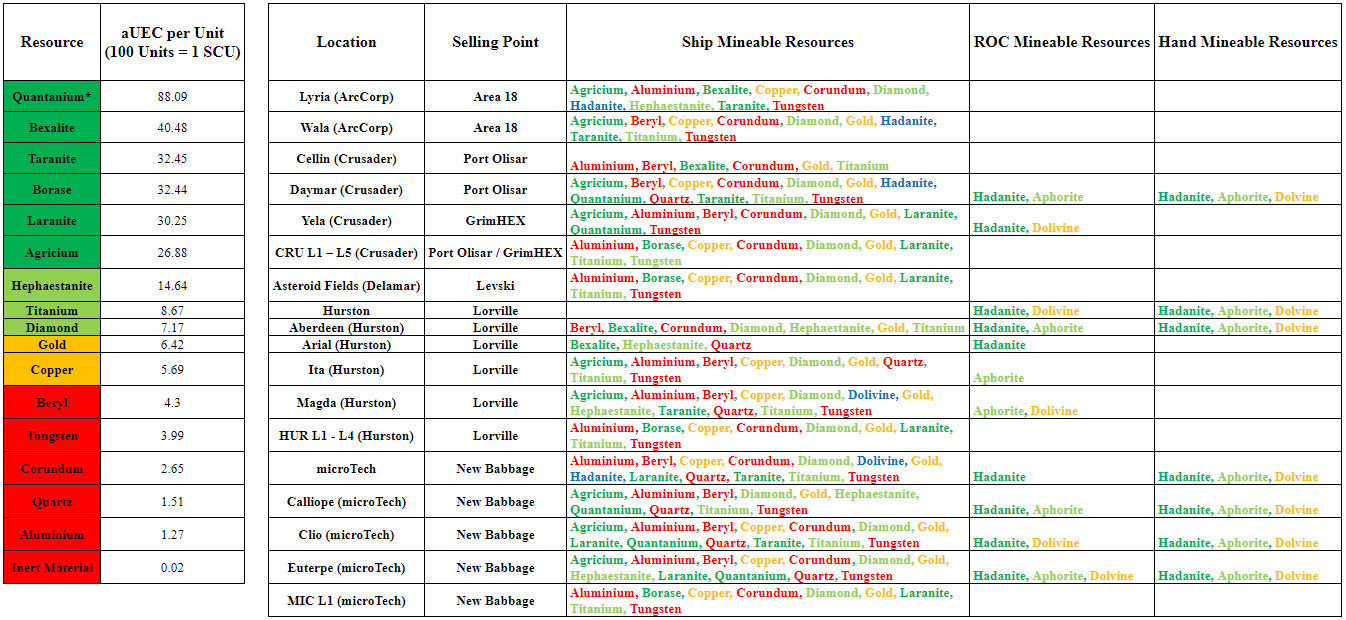
Hand mining locations and value of the different minables:
Minables can be found at mines on moons or planets,though also they can be found within the asteroid belts i.e around Yela and also can be found within mining claims /asteroids fields. Some common locations are:
• Daymar: Kudre Ore (Closed)
• Aberdeen: HDMO-Dobbs
• Hurston: HDMO-Calthrope
Resource deposits for Hadanite, Aphorite and Dolivine all have varying coloration with veins running through the stone and pieces of gemstone protruding at random angles. Veins of Hadanite deposits range from pink to light purple while Aphorite is violet and Dolivine is green. Hadanite and Aphorite can be difficult to distinguish apart, so it is recommended you scan them with your multitool to confirm their classification.
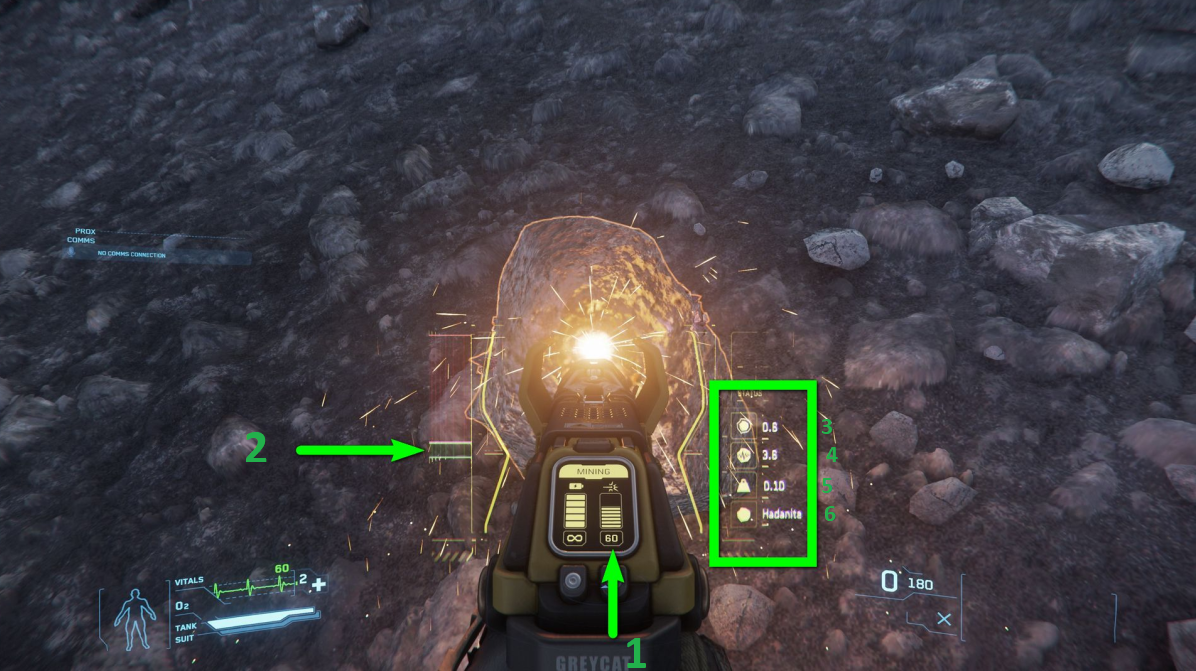
THROTTLE & POWER LEVEL - (Figure 1, numbers 1 & 2 respectively)
The multitool power throttle (1) should be increased/decreased in order to acquire a power setting within the green “sweet spot” (2). The throttle must then be adjusted in order to react to instabilities in the deposit’s energy transfer.
RESISTANCE - (Figure 1, number 3)
The resistance of a deposit indicates how much energy will have to be injected into the mining laser in order to fracture it. The closer the value approaches 1, the more resistant the deposit is to energy transfer and therefore the more difficult it will be to achieve fracture levels. For example, at a value of 0.8, the energy level will theoretically have to remain at a constant 80% energy input; this is assuming instability levels are low or nonexistent.
INSTABILITY - (Figure 1, number 4)
The instability of a deposit is displayed to the right, below the approximated resistance. The higher the instability, the greater the fluctuations in the energy feed. This can quickly lead to energy spikes, energy overload of the deposit, and thus a potentially fatal detonation of the deposit.
MASS (Figure 1, number 5)
The approximate number of harvested minerals from a deposit.
COMPOSITION (Figure 1, number 6)
The type of the scanned deposit.

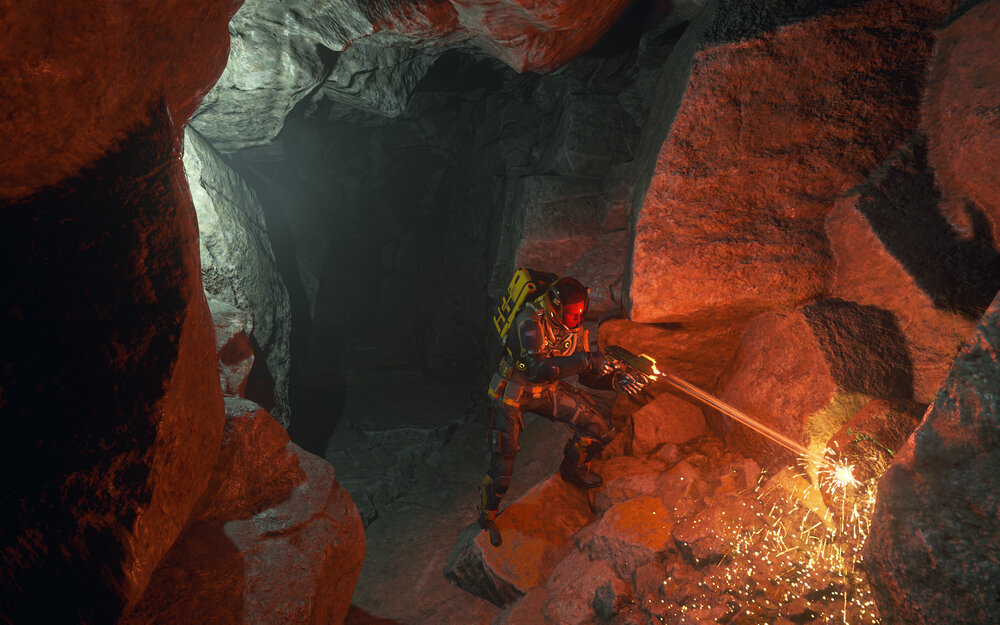
Tips of navigating cave mining
If you come to a split in a cave, mark the exit tunnel with a flare
Mark important locations as you travel
Mark out your turns, if you take a left, mark the left tunnel
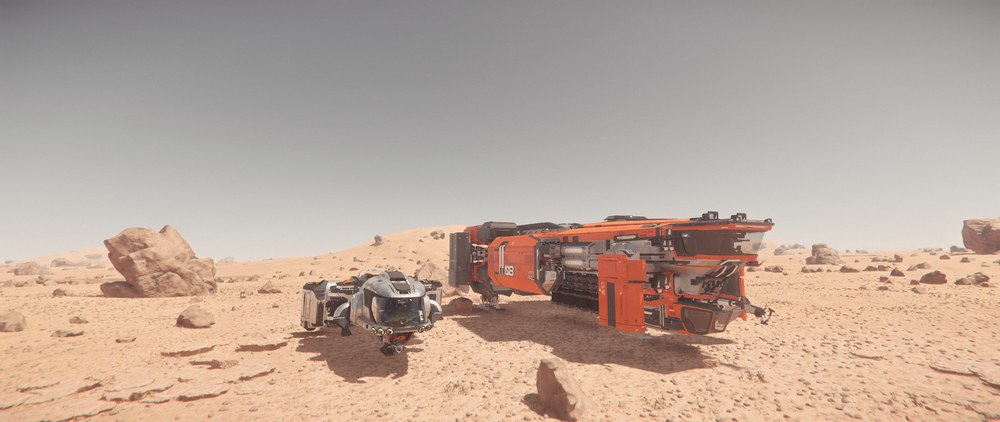
Ship Mining Guide
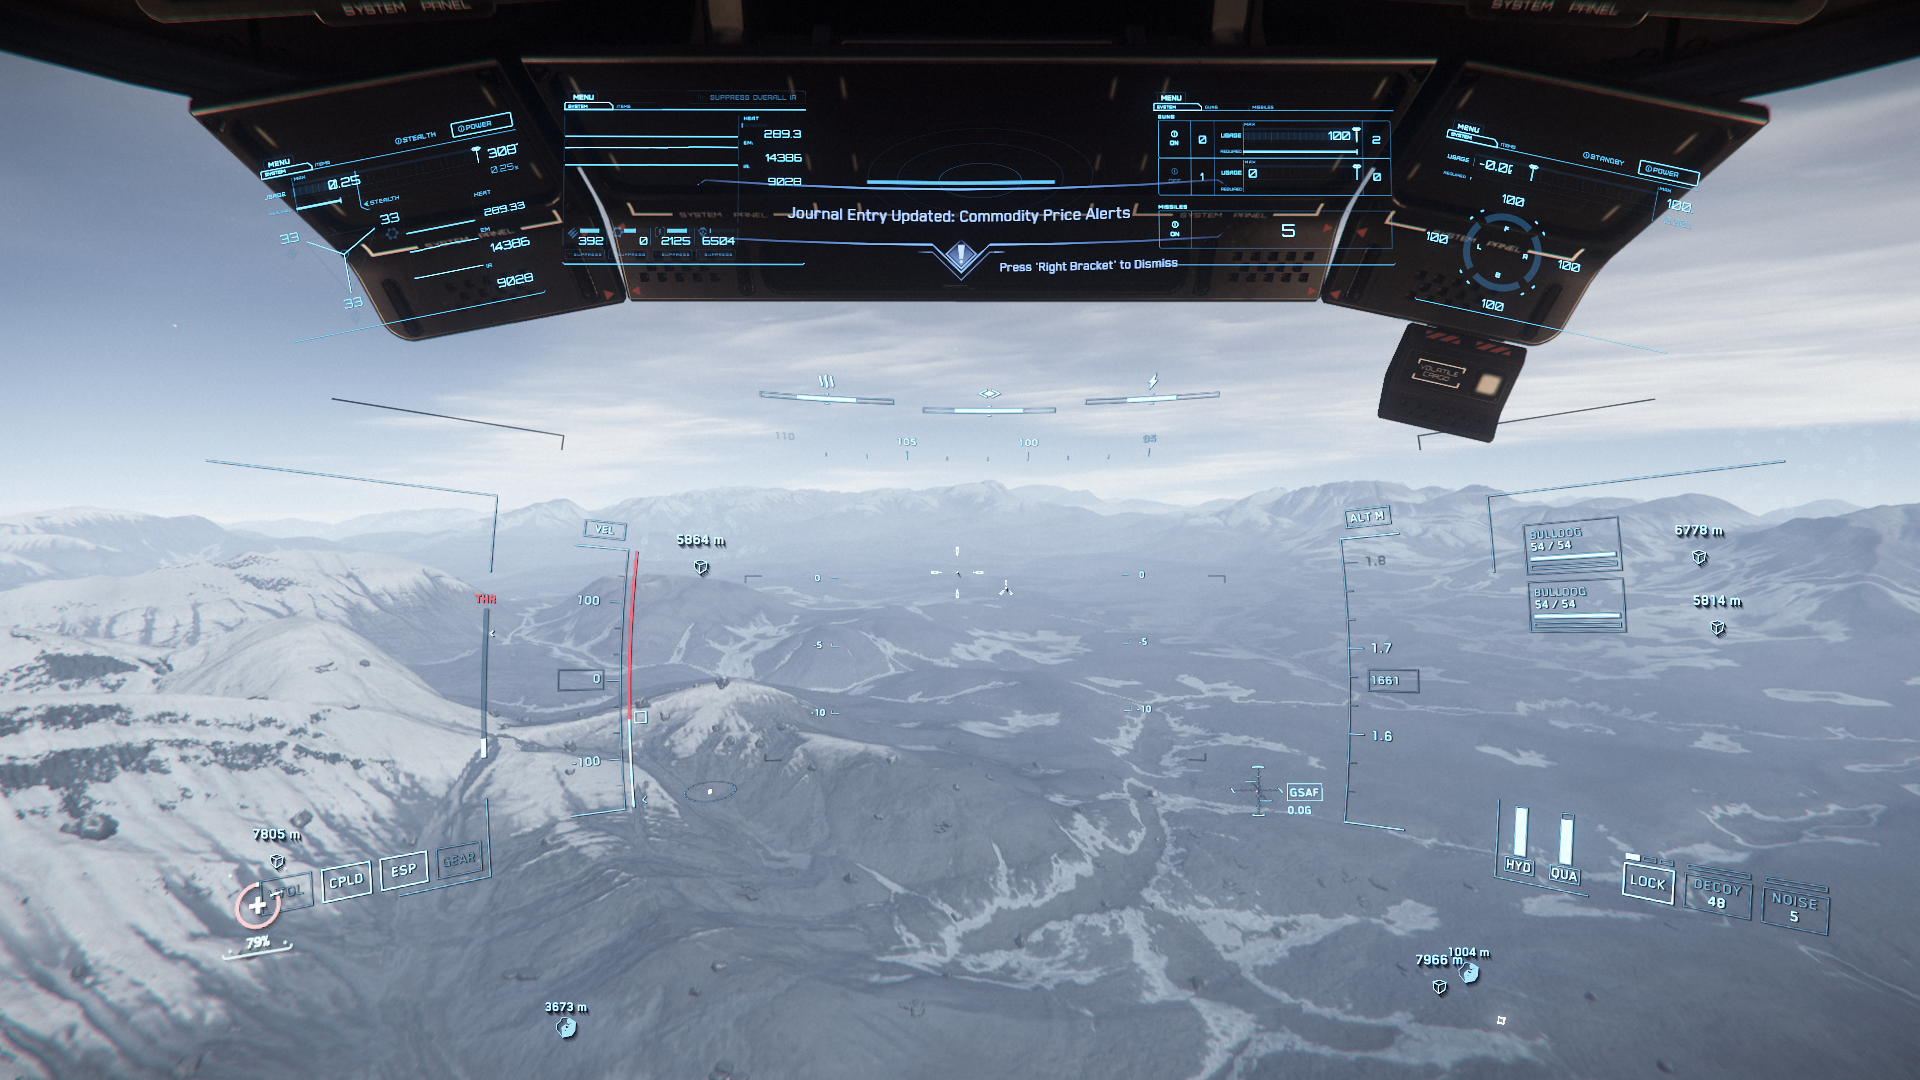
The light spatter can be seen in the upper left next to the cuboid shape.
The aforementioned bright diamond shape can be seen bottom right.
The Icon for the mineable rocks can be seen on the bottom of the view-pane
How To Locate Ore/Minerals?
Mine-able resources can be found by using a scanner in asteroid fields or on planets/moons. Push your tab key once to initiate a ping. If there are any Mineable materials or other ships they will show up with a smattering of light particles and a distance notification displaying in meters. when you approach the notified location a bright diamond will appear if there are multiple rocks multiple diamonds will appear after a few seconds they will switch to a blue icon shaped like a rock.
Scanning in an asteroid field will show you the mine-able asteroids within the scan radius and can be anywhere in the field of scanning.
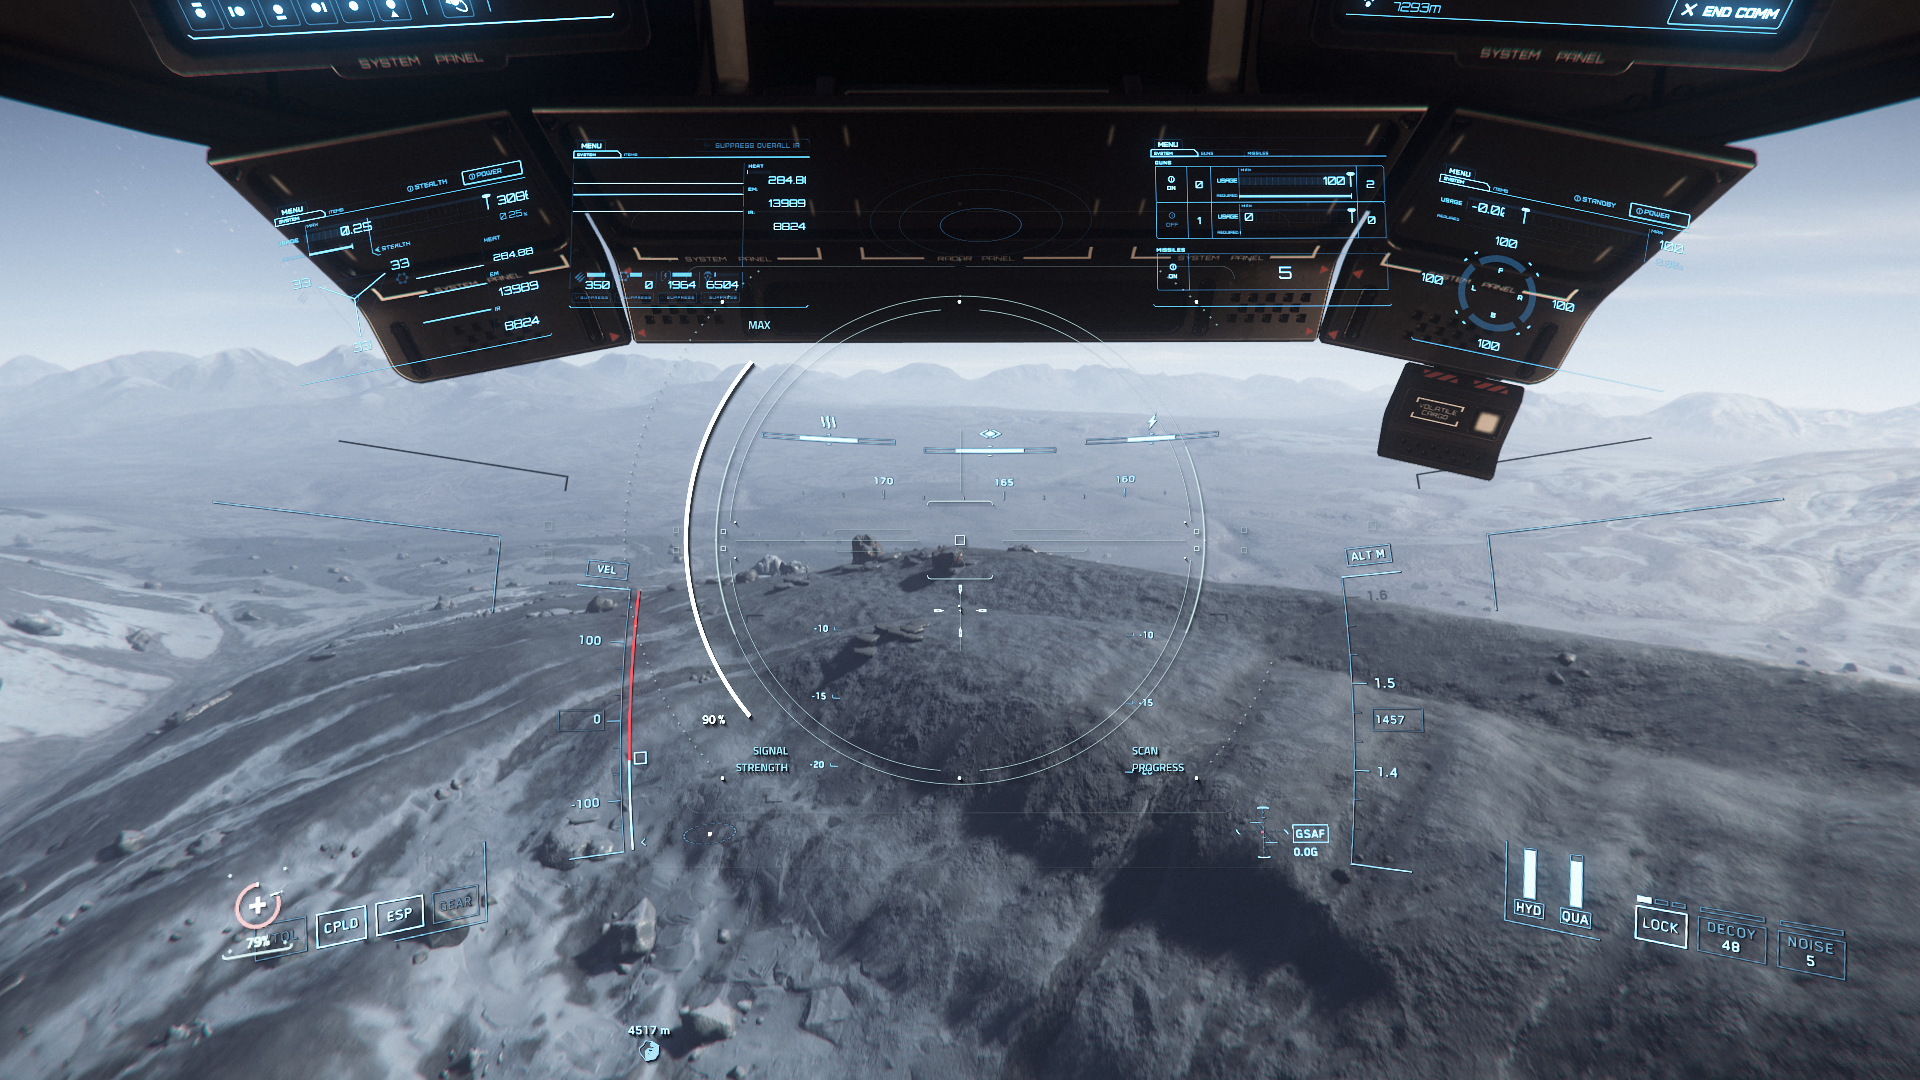
Press V and proceed to align ship and target cursor to the rock to perform a depth scan, by using the mouse wheel you can increase the signal strength, this can really help with accurately scanning each rock after a few moments a blue bar will fill on the right side of the circular targeting reticule. once this has reached full you will get a readout of all information pertaining to that rock.
Note that when sending out a ping wave you also increase your ship’s passive radar detection range, allowing others to find you easily.
Scanning
All Resource deposits can be examined by scanning either with the mining mode or with scanning mode. The scan often doesn’t start until the rock blinks, you’re very close or have switched to mining mode (Button “M”). Mineable rocks will have an orange outline during a scan. The following data will be obtained:
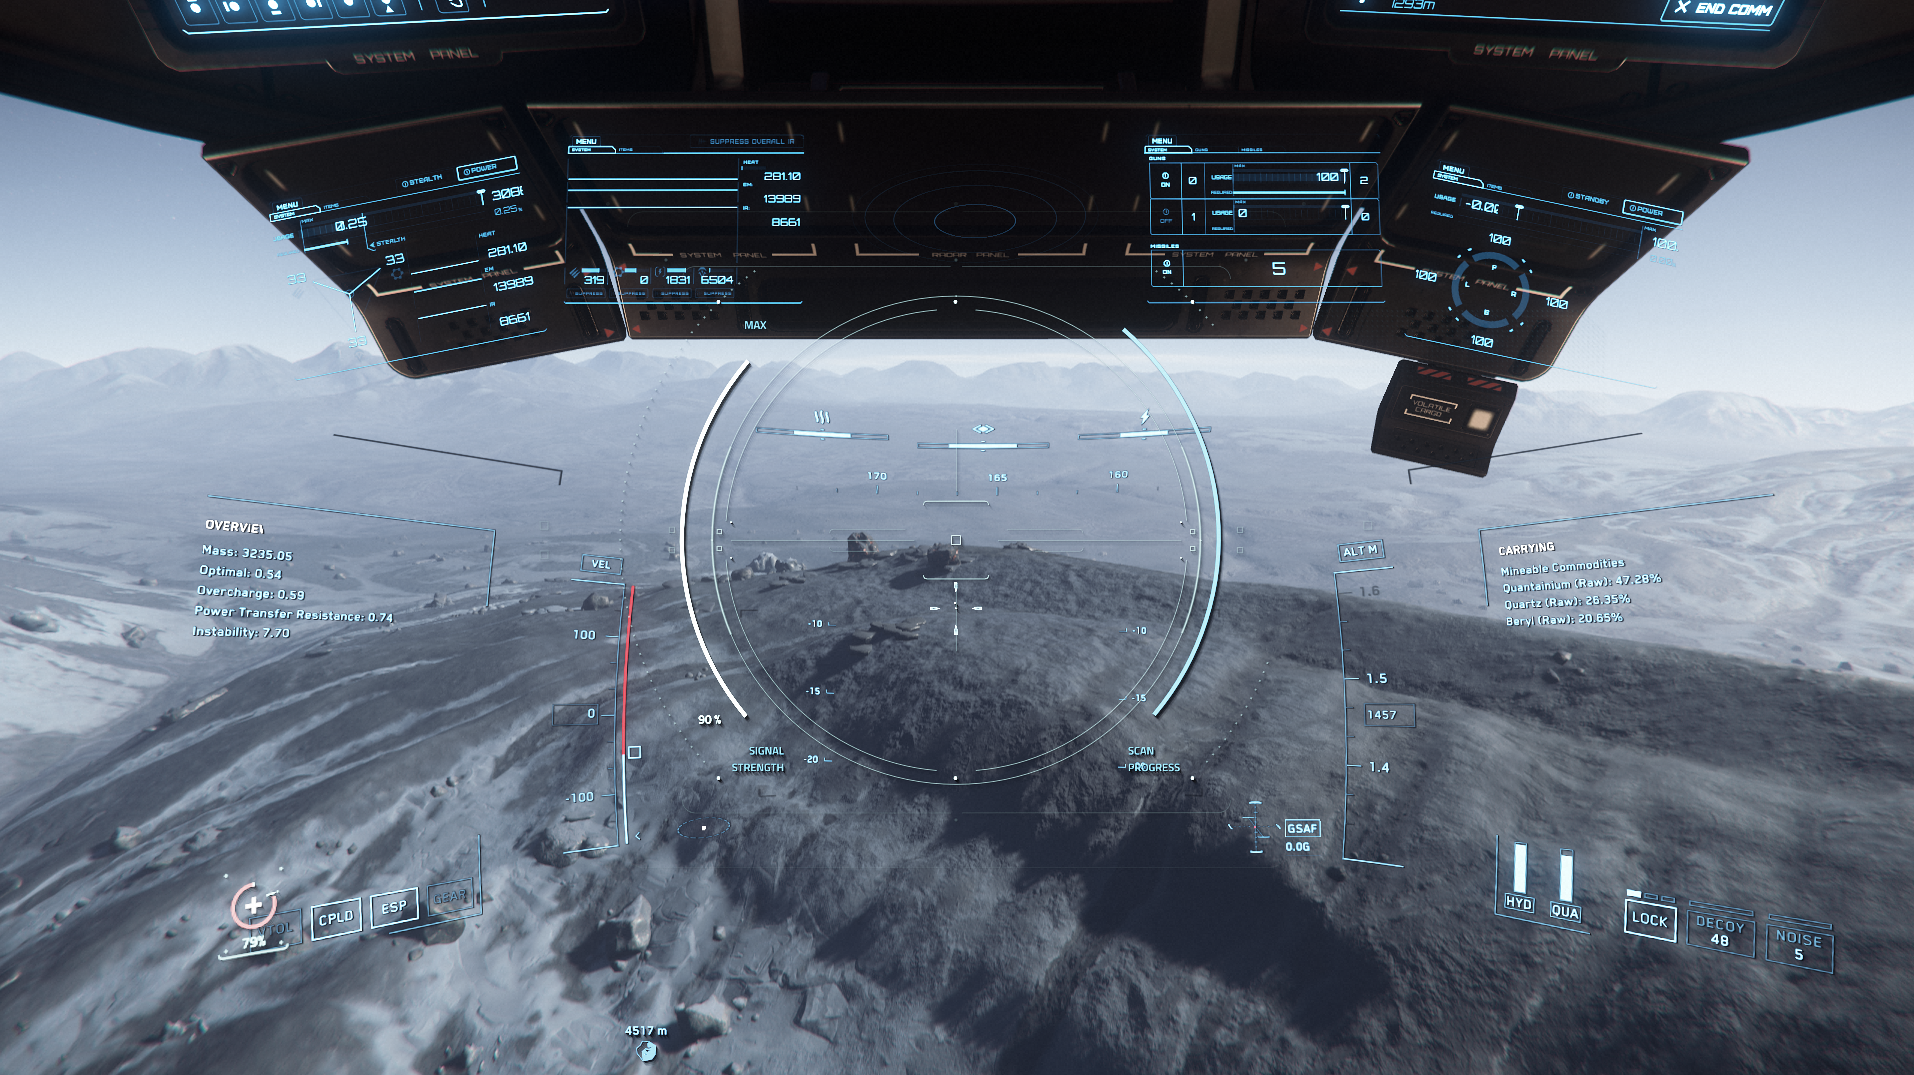
Mass
On the top right of the mining interface of the Prospector you will find the mass of the rock. The higher the mass, the more energy you need to crack the rock.
Composition
The composition is presented to us below the mass display of the rock. The material quantity is given as a percentage Most of the rock will be consist of useless material called inert material while the valuable parts of the rock will consist of valuable ores.
Instability
The instability of the rock is displayed to the left below the energy transfer graph. The higher the instability, the faster the rock tends to overload and explode uncontrollably.
Resistance
The resistance of a rock (the value is displayed in the user interface below the instability value) indicates how hard it is for our mining laser to crack it. The higher the number, the more resistant the stone is and the higher the laser will be need to be powered up.

Fracture Mode
Activate mining mode by pressing “M” on your keyboard and your ship will automatically prepare for fracture mode. Activate the mining laser with the left mouse button. The goal is to completely fill the fracturing sensor on the right side. To do this, we need to keep the energy level of the stone (Rock Energy Level, the indicator to the left below the laser strength indicator, Laser Throttle) in the green area. This area can be quite small and it takes some practice to keep the laser energy there long enough until the fracturing sensor is completely filled. You can change the strength of the mining laser by turning the mouse wheel.

Extraction Mode
When you fracture the rock in front of you successfully it will break into several fragments. Some will have a yellow-orange outline and you will have to break them again and others will have a purple outline which means that you can start the extraction of minerals. While doing so, pay attention to the mass-content ratio of the individual boulders and leave small resource percentages behind. Press your “Right Mouse Button” to switch to the extraction mode and start using your tractor beam. Simply target the purple fragments, fire the tractor beam and extract the minerals inside it. Your cargo hold will start filling so all you have to do is rinse and repeat until it is full.

Refining Guide
Warning! this Refining Guide is under active development and based on 3.12 PTU, thus subject to change

Refining Locations
To refine raw ore mined utilizing the Prospector or Mole, you need to visit one of the verses Refinery stations located at various Le Grange points. There are currently 5 refinery stations, here are the closest stations to the main planetary bodies:
Crusader’s closest station is CRU L1
Hurston’s closest station is HUR L1 & HUR L2
ArcCorp’s closest station is ARC L1
Microtech’s closest station is MIC L1

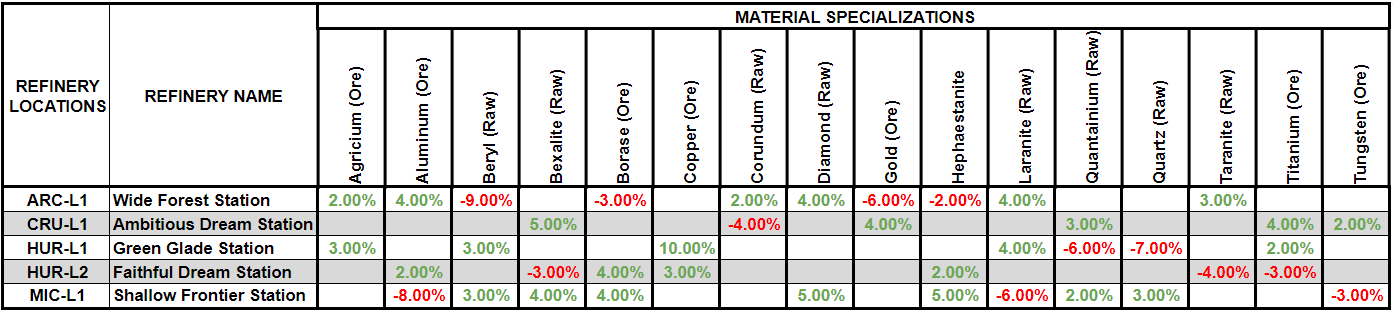
Refinery Specialization
Each refinery have specialized machinery for refining certain materials which provides it a boost or drop in the mining yield of the materials. So depending on what you mine it may be worth your while to make the trip to a refinery that is specialized in the ore you have. See the table below for the overview on each station’s Specialization.

Refinery methods
There are five refinery methods that can be utilized, each with a verity of cost, time and mining yield.
Cormack Method low yield, medium expense and very quick
Dinyx Solventation High yield, low expense and very slow
Electrostarolysis Medium yield, medium expense and slow
Gaskin Process Medium yield, High expense and quick
Pyrometric Chromalysis High yield, High expense and slow
What Is Worth Mining And Where To Find Them
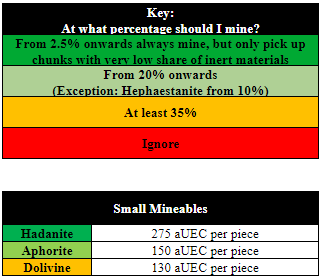
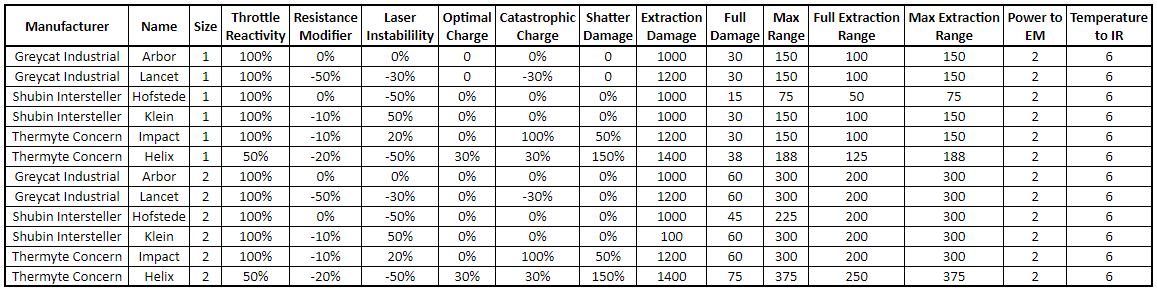
Which Mining Head To Use
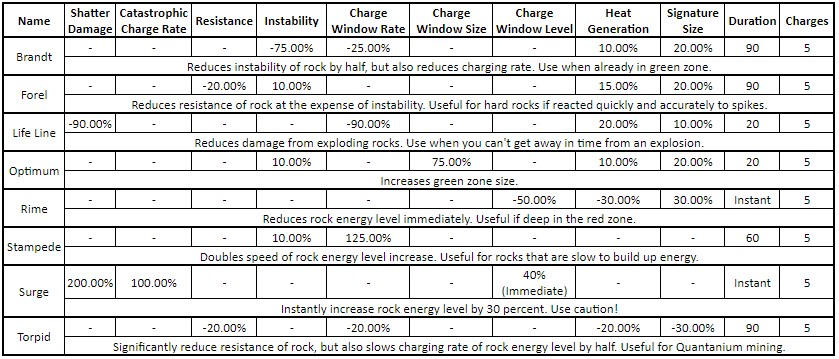
Which Consumables To Use
SELLING
After you have filled your cargo hold you can head back to one of the trading kiosks located in Port Olisar, Grim Hex, Levski, or Lorville.
Check out the link below to view maps to the locations above.